
![PiKVM - Control up to 4 servers simultaneously [archived]](/content/images/size/w2000/2021/07/IMG_0041.jpg)
This is every homelabbers dream isn't it? Controlling multiple systems that don't have IPMI natively, remotely. Thanks to PiKVM, we've been able to do this on a 1:1 basis for a while - but I've found a HDMI/USB KVM switch which will let us up that number to 4:1.
PiKVM is designed to run on a Raspberry Pi 4 (it will run on a Zero but performance will be awful). It uses an HDMI CSI bridge adapter to capture the input from a remote system and using the OTG capabilities of the USB-C port on the Pi 4, spoofs standard HID devices like keyboard and mouse in software. All this is presented in a slick webUI which can handle up to 30fps like a champ.
With this software is possible to control a remote system as if you were sat in front of it. This includes getting into the BIOS and everything else - even virtual disk mounting is possible! There are full instructions on the PiKVM project website for ATX power control too allowing you to emulate pushing the buttons on your case.
Hardware
You will require the following hardware to make this work:
- 1x Raspberry Pi 4 (2GB is fine for PiKVM) - https://amzn.to/3xd3sfc
- 1x HDMI-CSI bridge - https://amzn.to/3hspyUk
- 1x HDMI/USB AIMOS KVM Switcher - https://amzn.to/2UXwQrA
- 1x optional USB C Power splitter - https://www.pishop.us/product/usb-c-pwr-splitter/
You should expect to pay around $60 for the KVM switcher, about $40 for the HDMI CSI bridge and about $50 for a Pi 4. Total cost will be comfortably under $200 even factoring in all the power supplies and other cables needed.
You'll also need a USB power splitter because the Pi 4 slurps up the juice. Full details on that can be found in the PiKVM project's documentation.
The above video was recorded a few minutes after I got this working a few days ago, it's not pretty but hopefully illustrates the point. Here's a basic wiring diagram that should help explain things a little more clearly.
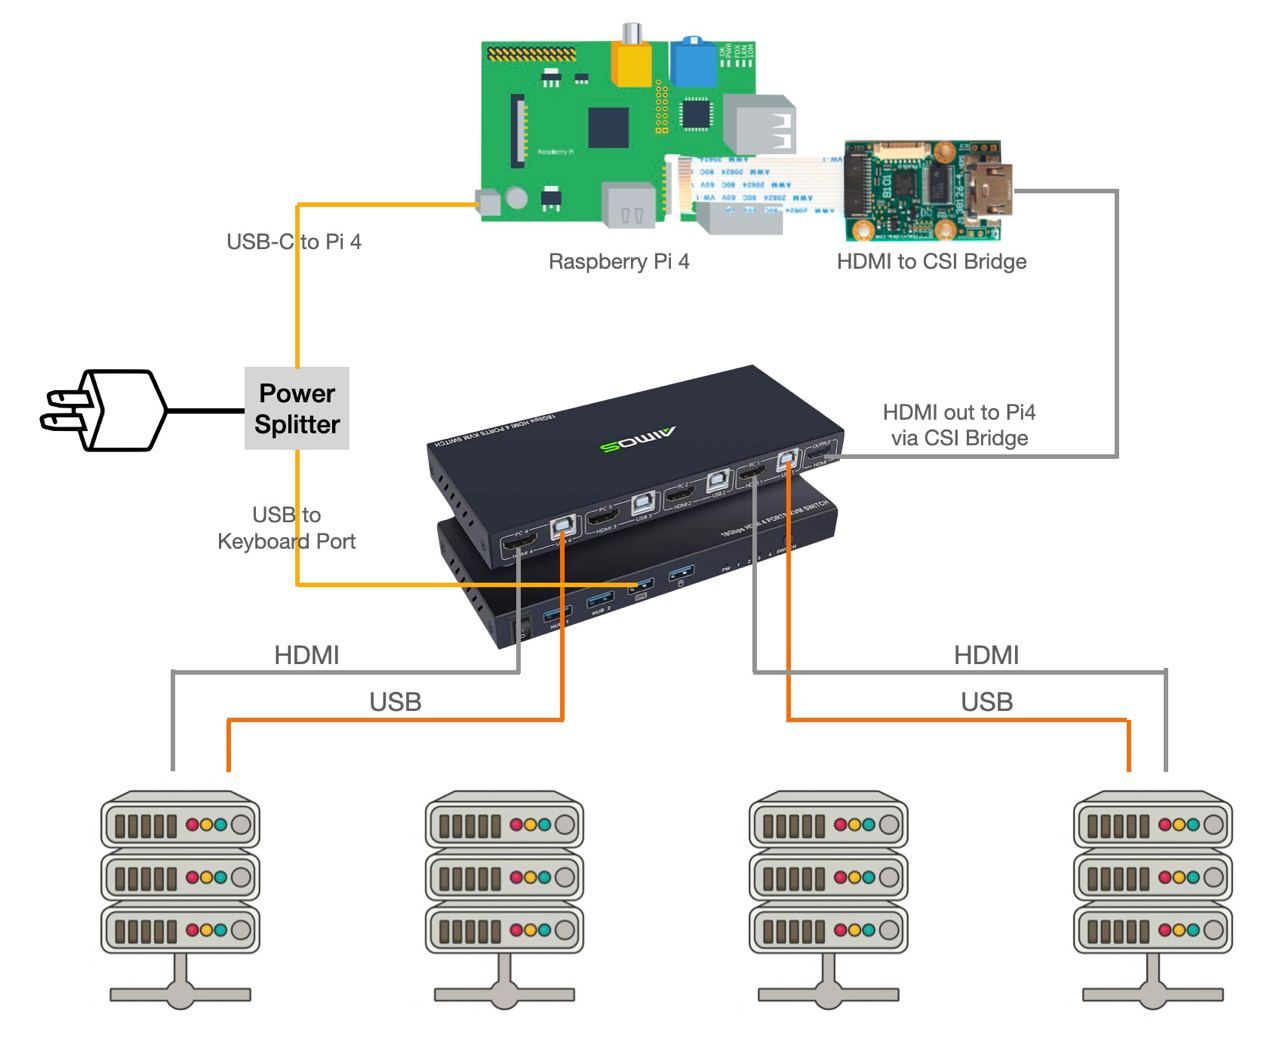
It's absolutely critical to use a good power supply here as the Raspberry Pi 4 can pull up to 3 amps, most USB power supplies are 2 amps or less. The KVM switcher itself is USB bus powered (no AC adapter required).
PiKVM + Switching
To start, set up PiKVM as you would any other Raspberry Pi OS. Download the image, flash it to an SD card and boot. Default username in the webUI is admin/admin.
Once you've got the PiKVM software going it's simple to change between systems. Press Ctrl, Ctrl 1 where 1 is the input number into the KVM of the system you want to switch to. So Ctrl, Ctrl 2 would select input 2.
Quicksync and power saving
There might be some issues with Intel GPUs going to sleep if the input is not selected. A typical workaround to this is to use dummy HDMI dongles but here we can use HDMI to VGA to HDMI adapters, this tricks the GPU into negotiating an always on signal with the digital to analog converter meaning it won't go into power saving mode.
This step is optional and only needed if you're running Quicksync - other more expensive KVM switchers are available which spoof EDIDs on the switch so these converter dongles would not be needed. I haven't tested any of those though so please let me know in the comments if you find one that works this way.
Podcast
For more information about this we covered it in episode 48 of Self-Hosted.