I’ve previously written about this topic but feel the need to post an update as after watching a recent TechnoTim video, I have adopted a new 4x1 HDMI matrix which works a whole lot better.
The goal here is to use 1 PiKVM to control 4 servers “at once”. By “at once”, I mean “one at a time but with the ability to dynamically switch between up to 4 systems from a single PiKVM instance”.
I know the Raspberry Pi 4 is practically impossible to buy these days but if you have one from the old days you can use, then this project still makes a ton of sense.
Bill of Materials
You will need:
| Item | Approx Price | Affiliate Link | Remarks |
|---|---|---|---|
| Raspberry Pi 4 | unobtanium | rpilocator.com | 2gb model (or more) is fine |
| Raspberry Pi 4 USB-C PSU | $13 | Amazon US | |
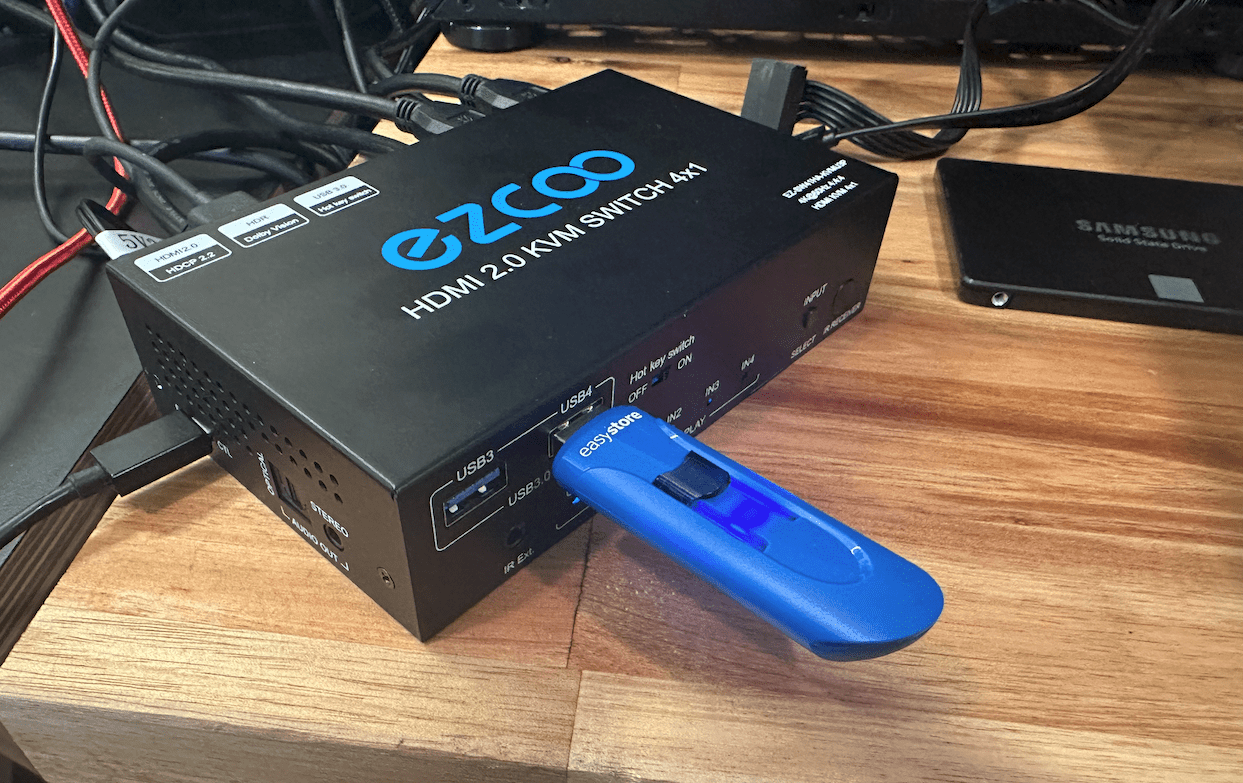
| Ezcoo HDMI 2.0 KVM Switch 4x1 | $140 | Amazon US | |
| HDMI to CSI module for Pi | $33 | Amazon US | |
| HDMI cables | $5+ | Amazon US | |
| USB-C / Power OTG Splitter | $5 | aliexpress | You can make your own if you like |
Connection Diagram
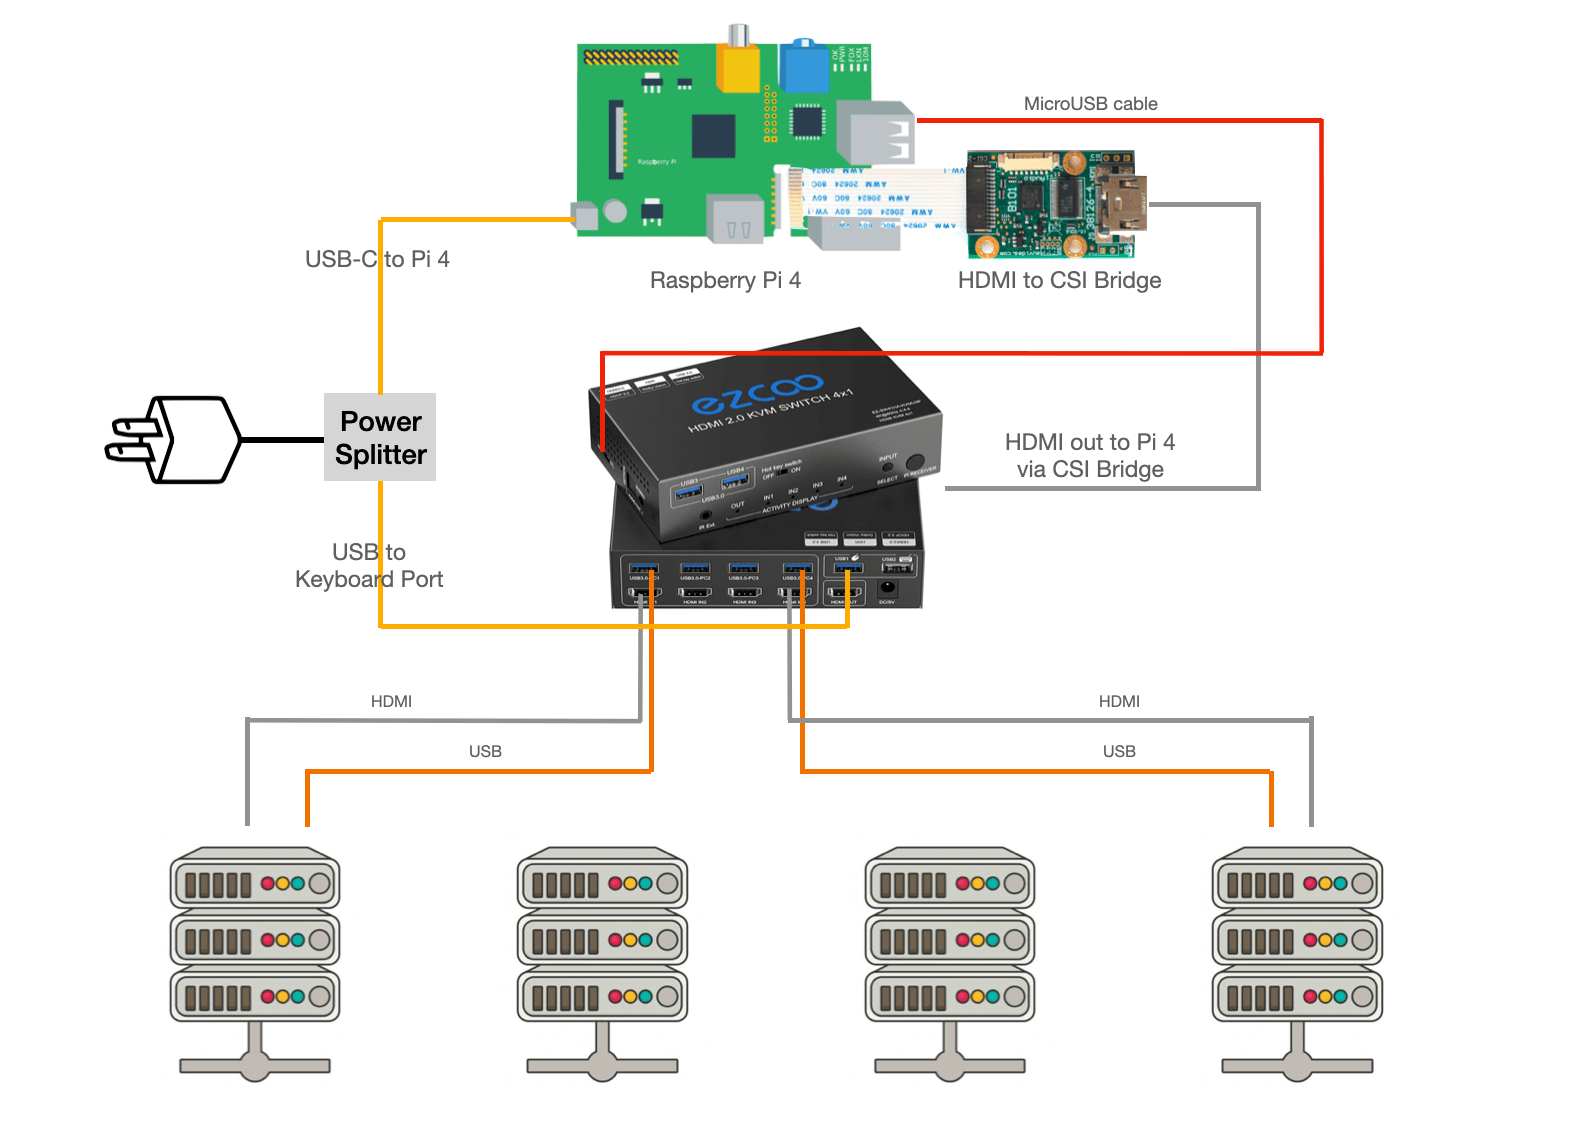
Note the MicroUSB from the Pi to the KVM switch? That’s where the magic really happens! USB based input switching, more on this in a second.
PiKVM configuration
Installation of PiKVM is much like any other Pi based imaging setup. Download the image from their website, flash it onto an SD card (or a USB drive if you prefer to live less dangerously) and boot the Pi. Update your system on first boot:
# login via ssh is root / root
$ rw
$ pacman -Syu
$ reboot
Now your PiKVM system is running, connect the matrix as shown in the wiring diagram above. Ensure there is nothing except a usb-c cable between the Pi usb-c port and your OTG usb-c splitter. I have the canakit Pi power switch and it strips the OTG functionality.
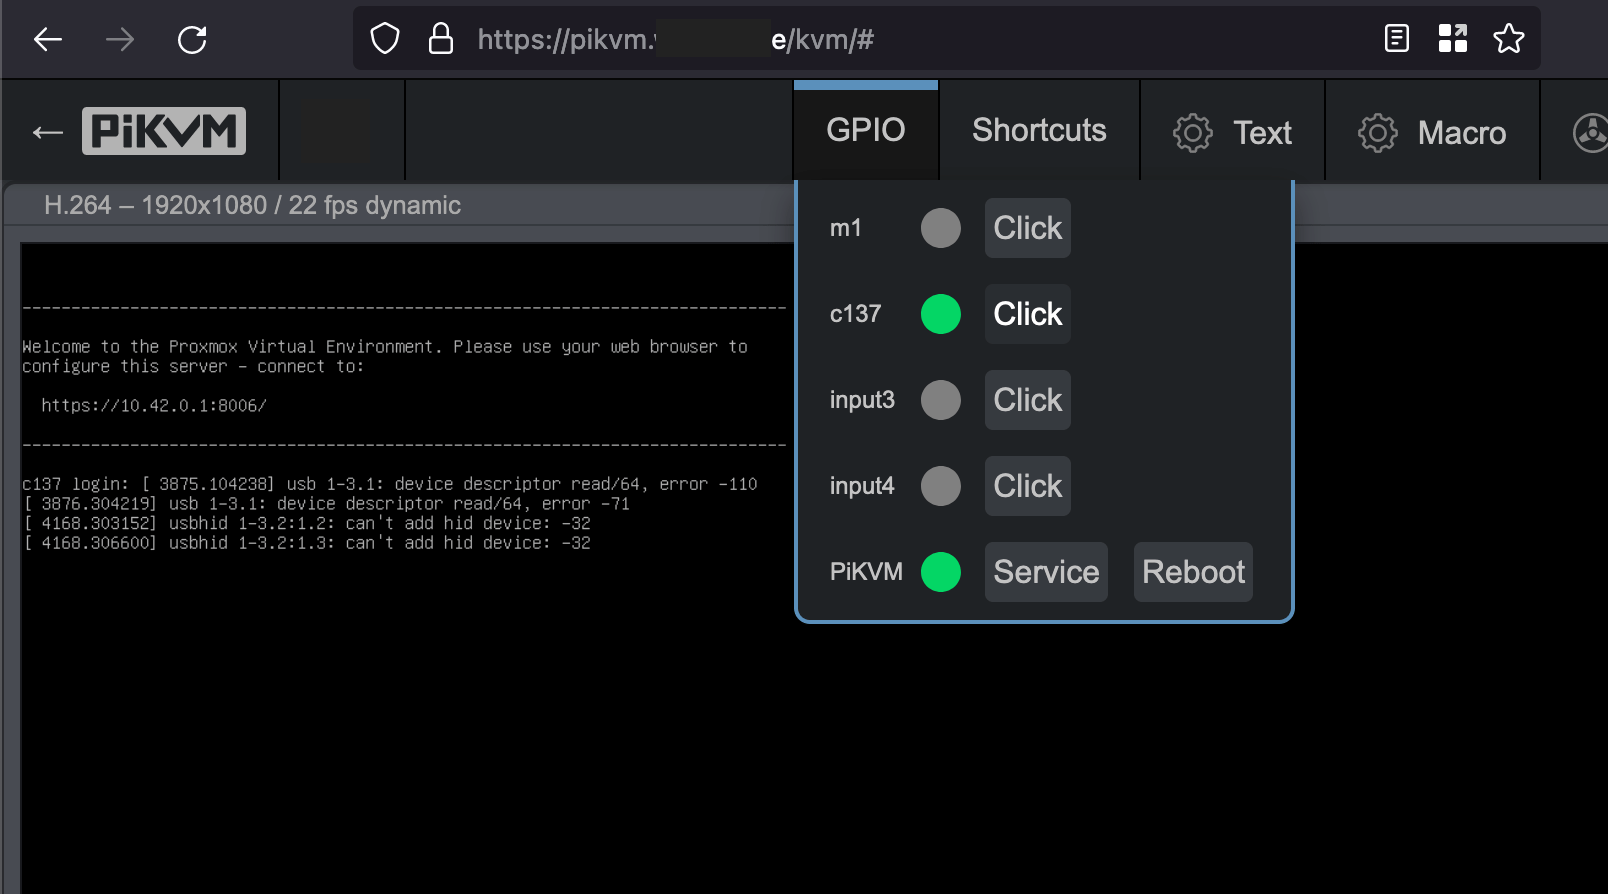
You should be able to test the switching functionality on the matrix itself now by pressing the input button. PiKVM natively supports controlling this matrix via USB directly making it much more reliable than previous attempts.
In order to configure the GPIO menu you will need to edit the file /etc/kvmd/override.yaml. Assuming your matrix shows up on /dev/ttyUSB0 (this is the default) the following code will require only minor naming adjustments. To check your TTY device in Linux use sudo dmesg | grep TTY looking for something like [ 12.927244] usb 1-1.4: ch341-uart converter now attached to ttyUSB0.
Code snippet
Here’s the snippet for /etc/kvmd/override.yaml:
kvmd:
    gpio:
        drivers:
            ez:
                type: ezcoo
                protocol: 2
                device: /dev/ttyUSB0
            reboot:
                type: cmd
                cmd: [/usr/bin/sudo, reboot]
            restart_service:
                type: cmd
                cmd: [/usr/bin/sudo, systemctl, restart, kvmd]
        scheme:
            ch0_led:
                driver: ez
                pin: 0
                mode: input
            ch1_led:
                driver: ez
                pin: 1
                mode: input
            ch2_led:
                driver: ez
                pin: 2
                mode: input
            ch3_led:
                driver: ez
                pin: 3
                mode: input
            pikvm_led:
                pin: 0
                mode: input
            ch0_button:
                driver: ez
                pin: 0
                mode: output
                switch: false
            ch1_button:
                driver: ez
                pin: 1
                mode: output
                switch: false
            ch2_button:
                driver: ez
                pin: 2
                mode: output
                switch: false
            ch3_button:
                driver: ez
                pin: 3
                mode: output
                switch: false
            reboot_button:
                driver: reboot
                pin: 0
                mode: output
                switch: false
            restart_service_button:
                driver: restart_service
                pin: 0
                mode: output
                switch: false
        view:
            table:
                - ["#m1", ch0_led, ch0_button]
                - ["#c137", ch1_led, ch1_button]
                - ["#input3", ch2_led, ch2_button]
                - ["#input4", ch3_led, ch3_button]
                - ["#PiKVM", "pikvm_led|green", "restart_service_button|confirm|Service", "reboot_button|confirm|Reboot"]
Note that table: essentially creates a table in the drop down menu using commas as column separators. Here’s a table help your understanding:
| Title | webUI LED | webUI button | webUI button2 |
|---|---|---|---|
| input1 | ch0_led | ch0_button | |
| input2 | ch1_led | ch1_button | |
| input3 | ch2_led | ch2_button | |
| input4 | ch3_led | ch3_button | |
| PiKVM control | pikvm_led | restart service | reboot pi |
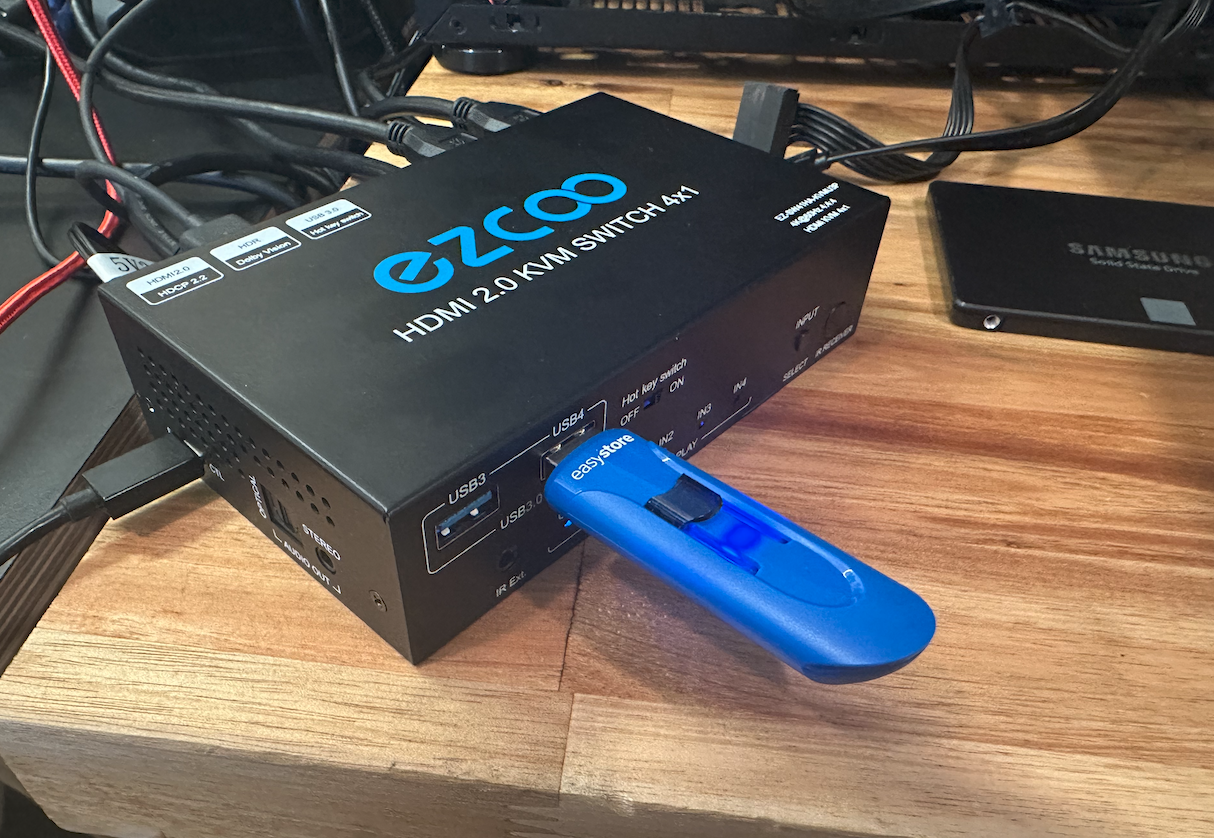
The USB thumb drive trick
Throw a USB thumb drive with Ventoy on it into the USB 3.0 data ports on the front of the KVM and you’ll be able to boot any ISO you’d like. For extra bonus points, try netboot.xyz as one of those ISOs to netboot any ISO you’d like! It’s so slick it’s almost unbelievable!
Conclusion
And there we have it. One PiKVM able to control and view up to 4 systems at once. And with the addition of a USB thumb drive to the KVM we can even boot any ISO we want!
In my testing so far this works flawlessly. The last version had some edge case weirdness around power on order due to HDMI power backfeed, but this solution seems to have no such issues.
If you’re familiar with PiKVM and have been wanting to make it easier to control multiple systems “at once” then there’s really never been a more polished solution than this. Huge thanks to the PiKVM project for this truly amazing project - they are launching the PiKVM v4 very soon! And thanks should also go to TechnoTim for putting me on this new ezcoo HDMI matrix.