

Relying on the built-in motherboard headers on server grade motherboards to reliably control fans with Linux has been a crapshoot since forever. I can tune out a constant white noise pretty easily but the one thing that is unacceptable are fan notes that change wildly or oscillate.
Well my friends, I'm pleased to report that last summer the Corsair Commander Pro received native Linux kernel driver support in the 5.9 release.
This device used to be Windows only so it was a really lovely surprise to find that this driver shipped last year. BIG thanks to the developer Marius Zachmann who made this happen.
This sleek black box can be had for $40-75, I was fortunate enough to get mine for $40 because it seemed like a good idea before I realised it didn't support Linux and had to run a Windows VM for control. That changes today!
Configuration of this device is quite straightforward but is a little time consuming. You will need a kernel of at least 5.9 or later. I created a tiny Arch VM to run automatically on boot under ESXI and passed the USB device through to the guest for this purpose which uses 256mb of RAM.
Configuration
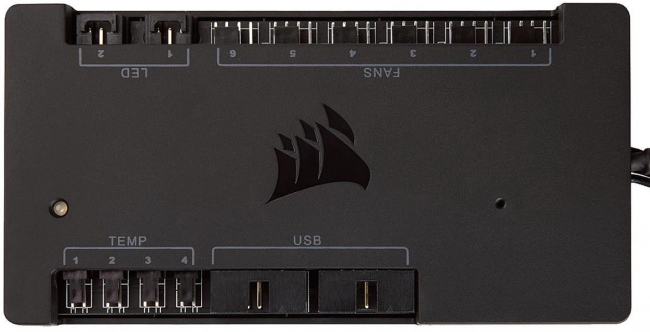
First you'll need to connect the Commander Pro to a USB header on your motherboard, hook up some fans and at least one temperature probe.
Next, ensure that fancontrol and lm_sensors are installed (this varies per distro so no instructions here). Then run:
sensors-detectFollow the prompts and you should see the fan speeds and temp probe readings like this:
[root@fancontrol ~]# sensors
corsaircpro-hid-3-2
Adapter: HID adapter
in0:          12.01 V
in1:           4.90 V
in2:           3.33 V
fan1 4pin:    898 RPM
fan2 4pin:    924 RPM
fan3 4pin:   1062 RPM
fan4 4pin:   1075 RPM
fan5 4pin:   1013 RPM
temp1:        +26.4°C
Now it's time to run pwmconfig and follow the prompts on the screen to test the various PWM values and how they interact with the RPM values of your fans. That process will look something like this:
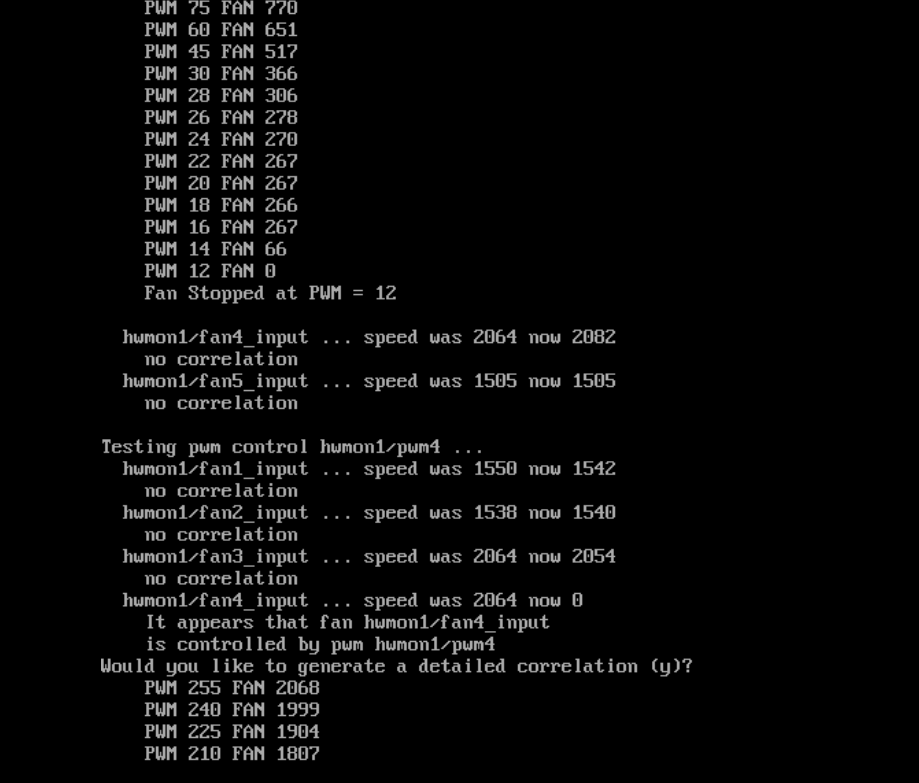
At the end of the pwmconfig wizard you'll be asked to set which temp probe correlates to which fan. You might decide it's easier to configure these values later and hit the "just save" button.
Once you have a working config (my full config is posted at the end of this article), you can test things out by running watch sensors in one terminal window and then fancontrol in another. If things aren't working quite right make changes to /etc/fancontrol and then repeat running fancontrol and so on. If you're happy with the outcome then enable the fancontrol service with:
systemctl enable fancontrol --nowThere you have it. Native fan control via a USB controller on Linux.
My /etc/fancontrol for reference
The snippet below is my tweaked /etc/fancontrol file which took about 10 minutes of tweaking values to get everything just where I wanted. Hopefully it's a useful reference for you, fancontrol is quite helpful with errors if you screw up some values so tweak away!
[root@fancontrol ~]# cat /etc/fancontrol
# Configuration file generated by pwmconfig, changes will be lost
INTERVAL=2
DEVPATH=hwmon1=devices/pci0000:00/0000:00:11.0/0000:02:00.0/usb2/2-2/2-2.1/2-2.1:1.0/0003:1B1C:0C10.0002
DEVNAME=hwmon1=corsaircpro
FCTEMPS=hwmon1/pwm2=hwmon1/temp1_input hwmon1/pwm1=hwmon1/temp1_input hwmon1/pwm3=hwmon1/temp1_input hwmon1/pwm4=hwmon1/temp1_input hwmon1/pwm5=hwmon1/temp1_input
FCFANS=hwmon1/pwm2=hwmon1/fan2_input hwmon1/pwm1=hwmon1/fan1_input hwmon1/pwm3=hwmon1/fan3_input hwmon1/pwm4=hwmon1/fan4_input hwmon1/pwm5=hwmon1/fan5_input
MINTEMP=hwmon1/pwm2=50 hwmon1/pwm1=50 hwmon1/pwm3=50 hwmon1/pwm4=50 hwmon1/pwm5=50
MAXTEMP=hwmon1/pwm2=60 hwmon1/pwm1=60 hwmon1/pwm3=60 hwmon1/pwm4=60 hwmon1/pwm5=60
MINSTART=hwmon1/pwm2=24 hwmon1/pwm1=24 hwmon1/pwm3=16 hwmon1/pwm4=16 hwmon1/pwm5=16
MINSTOP=hwmon1/pwm2=24 hwmon1/pwm1=24 hwmon1/pwm3=115 hwmon1/pwm4=115 hwmon1/pwm5=165
MINPWM=hwmon1/pwm2=24 hwmon1/pwm1=24 hwmon1/pwm3=115 hwmon1/pwm4=115 hwmon1/pwm5=165
MAXPWM=hwmon1/pwm2=195 hwmon1/pwm1=165 hwmon1/pwm3=185 hwmon1/pwm4=185 hwmon1/pwm5=185